We all have a Pinterest account we started in middle school that’s covered with boards like “Wedding Ideas”, “My Closet” and “Food to Try”. Along with who knows what else we were going through in that chapter of life and beyond.

But just like you don’t use your yahoo or hotmail email anymore, you don’t want to use your personal Pinterest account to grow your business.
So, let’s set up your Pinterest Business account.
Do you really need it though? Simply put, yes. For one, it’s free so why not! And two, it comes with some great analytics and features to help you get in front of your ideal audience. Plus there’s this thing called Trends that shows you when interest in a certain topic you talk about spikes, so you can strategically put out content and highlight your best work during those times.
Well, there’s quite a few great reasons to have a business account. But for now, we’re going to focus on getting it set up.
Quick warning: This is going to be a longer blog because I want to make sure you have the best information in one place to get started. If this seems like too much, don’t worry! I can do this all for you if you’re interested, you can read about the Pinterest Account Set Up.
Otherwise, lets jump in:
The 5 steps:
- Creating a business account
- Finding the correct keywords and trends
- Optimizing your name and description
- Creating boards with descriptions
- Pin planning
Creating a business account
To start, you’ll need/want to get on your laptop or computer, it’s just easier to set it up there.
Now, you can turn your personal account into a business account. Just go to account settings and that option will be there.
However, I’d strongly recommend creating a new business account.
For one, there will be more clean up of boards if you use your personal one. For instance, if you’re a photographer, but your account has ideas for poses, food recipes, closet goals, and winter nails, that won’t help Pinterest show your account to the right people. And even if you make the non-related boards private, any ideas you have in the photography ones, will lead people AWAY from you and TOWARDS other people.
The goal of your Pinterest account is to bring potential clients to you to buy or sign up. And if you have too much from other people, your new pins won’t be able to stand out.
And two, it’s just easier in general to create a new account. Keep your personal one to do as you please, and keep your business one focused on business. Plus, it keeps that separation so you can shut off work, and enjoy your time scrolling.
So after all that!
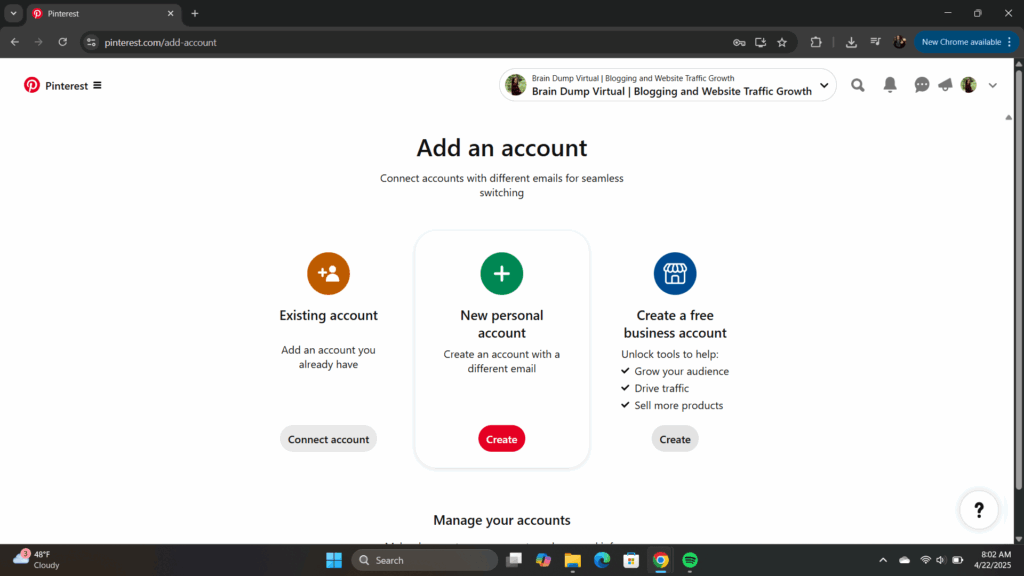
You’re going to click Create a Free Business Account. Then you’ll enter your business email where you want to get updates, a password you’ll remember, your birthday to prove you’re old enough, and click Create Account.
Next, there will be some questions you’ll need to answer. This will help Pinterest get to know your business a little more. Starting with Describe your Business, then Tell us about your business.
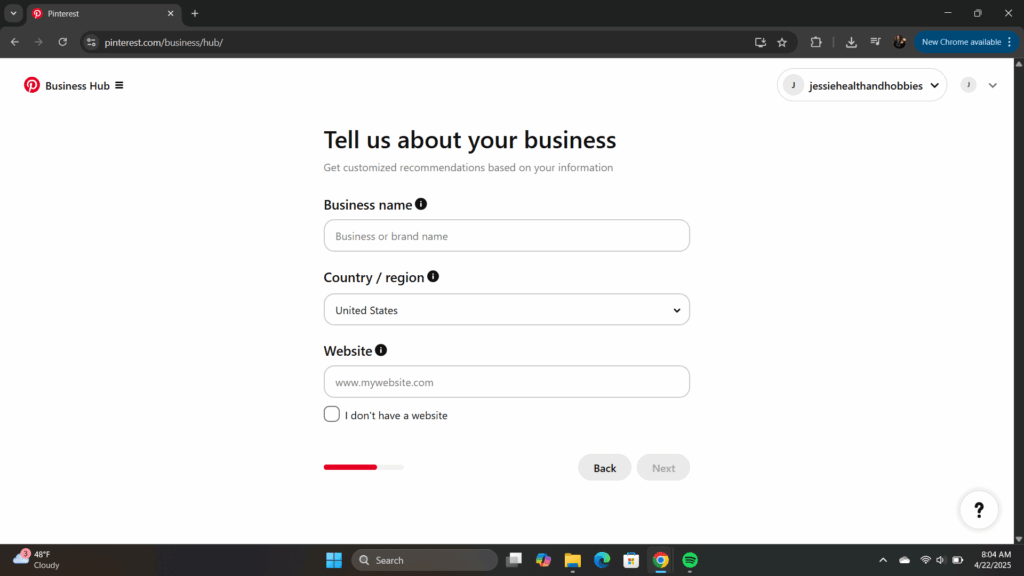
Here, be sure to edit the name of your business, or what you would like it to be called. It will automatically put your email, so make sure it’s specific! Either the business name, or if you’re a content creator, whatever your handle is or name you want people to search for. We’ll edit a bit more later.
If you have a website, be sure to add it here. You’ll be able to confirm it later, but if not, that’s ok too.
(Something I would suggest in the future as it will allow more opportunities for your content, but that’s another conversation)
Then it will ask you a few more details. Be honest with what you’re hoping to accomplish with Pinterest. It’s good for you and the platform to know.
The last question here is about if you’re interested in running ads on Pinterest. It will automatically put Yes, but if you’re unsure, I would mark it as No. You can always run ads later, but if you keep it at yes, they’ll send you reminders consistently to get it started.
Once you’re through that, it will ask you where you’d like to start. Since we want to make sure everything is ready to go BEFORE your first pin, click the (usually last option) Showcase your Brand, where you can edit your profile.
Finding the correct keywords and trends
So we’re going to take a little side step and look into keywords and trends quickly. Since you have a business account now, you have access to Pinterest trends, which is so fun!
But we’ll start with the search bar at the top. If you don’t see it, click the icon in the upper right to go to your account. It’ll be empty now, but we’ll change that soon!
Now in the search bar, we’re going to start looking up your main keywords.
These are going to be the topics your clients are looking for.
If you’re a photographer, that could be wedding ideas, family photoshoots, country couple, etc.
Fitness coaches might look up meal prep ideas, upper body workouts, fitness workout for women, etc.
Content creators could be looking into the topics they like to talk about, coffee recipes, fall outfits, makeup products, home bedroom refresh, etc.
Start simple and then see what other options Pinterst gives you. You’ll either see it at the top under the search bar, or farther down the page as you scroll. Start making a list of each topic you cover with different variations and search topics. Once you have 5-10 keywords and phrases for each topic, then we’ll go to trends.
Now, in the upper left corner with the Pinterest icon and 3 hamburger lines, you’ll click that and see all the options for your business account. What we’ll focus on now is the Pinterest Trends option under Analyze Performance.
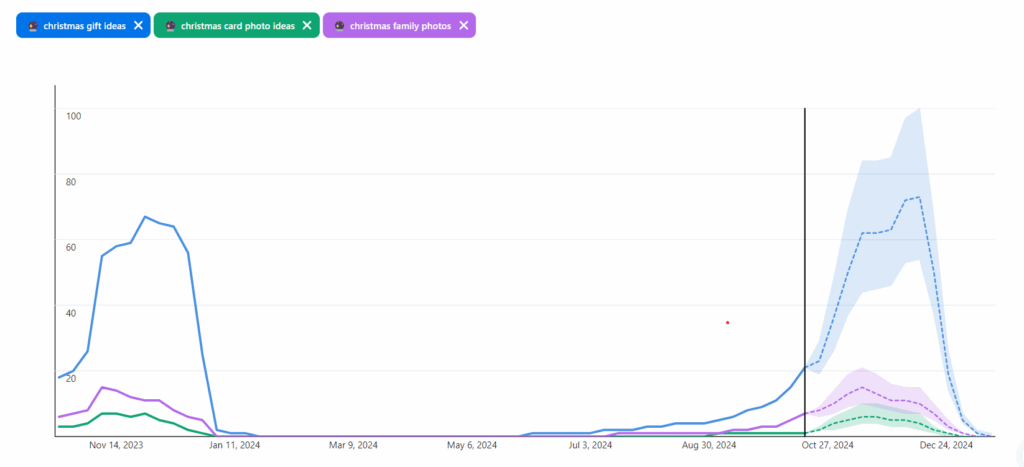
Here, just like with the search bar, I want you to pick a more broad topic, or one of the main keywords and start typing it in. The options it will come up with are all the big searches that go up in engagement throughout the year.
Click on one and it will show you when it spikes in searches. This is how you’re going to plan out your content even more. Do this with a few more options, or narrow it down more to compare.
I explain this a bit more in How to Schedule Out Your Pinterest Pins, but this information will help you plan out your month/year of content.
Because, the great thing about Pinterest is that your content doesn’t die after 24-48 hours like on other platforms. Since this is a search engine, it can keep coming back up year after year. So all the work you’re putting into this today? Will benefit you moving forward, and however long you decide to have your business.
To have a better understanding of why this is needed, check out The Importance of Keywords and Trends on Pinterest.
Optimizing your name and description
Now that you have a list of keywords, and you know when certain topics are trending, it’s time to optimize your account.
The reason we didn’t do it right away, is because we didn’t have the exact keywords your people are looking for. And that’s what we want to add to your account, so you show up when they’re looking for certain things.
Now you’re going to go back to your profile, hitting the icon in the upper right corner. Then there will be an Edit Profile button in the middle. Click that.
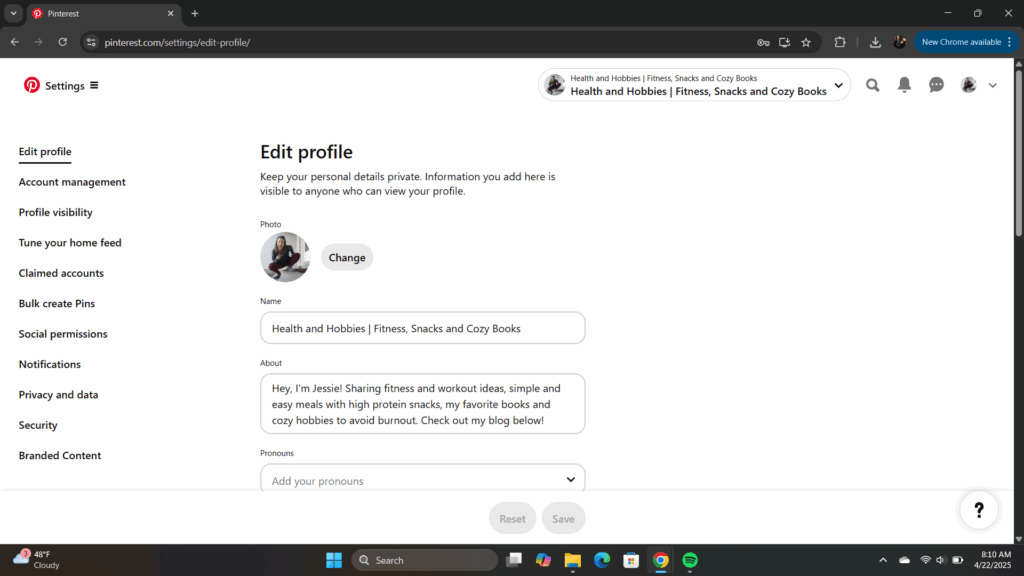
Here you’ll want to choose your profile image. This will either be you if it’s a personal brand, or your logo if it’s more of an agency or bigger than yourself.
Then, make sure your name is correct, and also add your job title or market focus.
For instance, my sisters’ reads:
J. Marie Photography | Minnesota Based Documentary Photographer
This will come up when people are searching Pinterest and come across one of your pins, before even clicking on it. Your profile could also show up if they search something specific you have in your name too.
Then be sure to add the keywords people are searching that your business helps with in the description. This gives people an idea too of who you are, what you do and who you help when they click on your profile from one of your pins. Make sure it’s conversational though, don’t just add all the keywords possible. Just keep the main topics you talk about.
The next thing you’ll want to check is the Claimed Accounts on the left-hand side. Here is where you’ll verify the connection to your website. It’s an HTML code that you’ll add to the Header of your website. It will be able to track the analytics for when people click from a pin to your website (if this sounds stressful and you have no idea about it, don’t add it, just put your website for now). Make sure you have the proper legal pages first, as you’ll be tracking people. Privacy Policy and Terms of Use is usually what you need, but be sure to do your research.
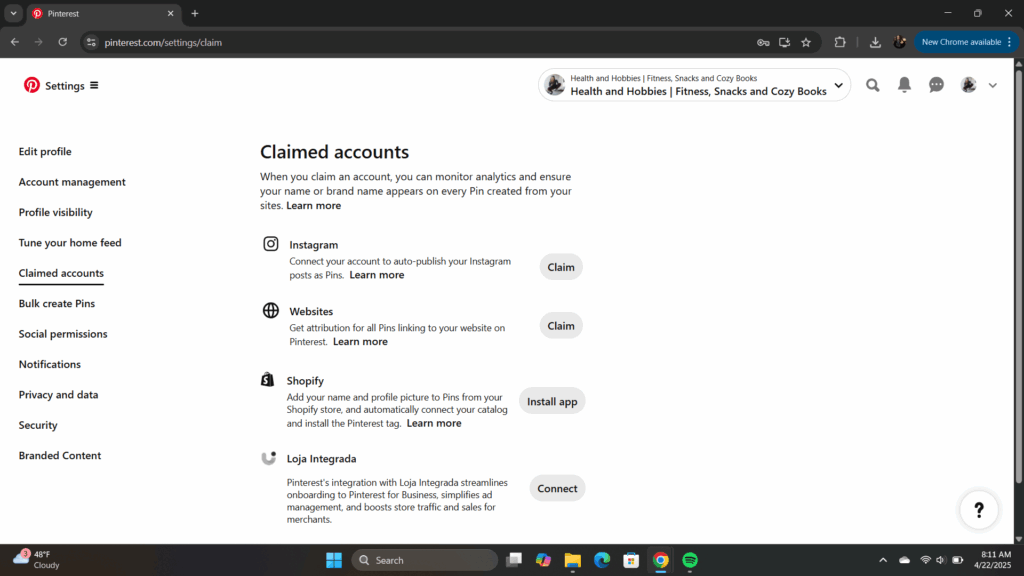
This is not legal advice in any way, just a reminder for more info.

Otherwise you can connect your Instagram account too, but make sure you don’t let it auto-publish from the site. Instagram and Pinterest are used differently, and keywords or description won’t work as well for both. People will be able to find you on Instagram, but I strongly recommend coming up with pins specifically for Pinterest based off of your other social content.
If this is getting to be a bit too much for you, don’t stress! Check out my Pinterest Account Set Up offer where I’ll do all of this for you. I have limited spots, so if you’re interested, you can read more about that offer.
Otherwise everything else should be set! You can click on the icon in the upper right corner to get to your profile. If you ever want to edit it again, just click Edit Profile below it, and it will take you back to the main screen.
Now it’s time to upload a cover photo. This can be a picture that represents your work, your newest offer that you’re promoting, or something that you created in Canva with more information to share. If you create one in Canva, the size you’re looking for is 800px X 450px
Once you’ve created it or decided, click the + button on the bottom right of the cover photo area and add it. You can always upload a new one later as well.
Now that the initial set up is done, it’s time to add the boards that are going to house all of your pins.
Creating boards with descriptions
Here you’ll want to start small to make sure you have content to fill the boards with. You can always add more as you create more content and have specifics you want to dedicate a board to.
But I recommend starting with 3-5 boards that focus on your main topics.
For a photographer, this could be Wedding Ideas, Family Ideas/Sessions, Couple Ideas/Sessions, Senior Ideas/Sessions, Specific locations, Mountain views, etc.
For a fitness coach, this could be Workout Ideas, Easy Meal Prep, At Home Workouts, Workout Outfits, etc.
For a content creator, this could be Coffee Recipes, Work From Home Outfits, Podcast Episodes, Kitchen Essentials, etc.
Whatever the main topics you focus on are, those will be the boards you create. But you want them to be specific and also based off of the keywords you’ve researched.
And then you’ll need to add a description too. Explaining what the board’s focus is, adding the keywords to explain, and then an action item.
“Follow my social media for daily recipes @yoursocialname”
“Book your next family session on my website www.contactme.com”
“Join our online community for weekly workout plans @yoursocailmedia or www.yourwebsite.com”
Also, when you’re just starting out, this will be the only time it’s ok, or I’d recommend adding other peoples pins to your board to get it started.
The more info Pinterest has to go off of to share your content to the right people, the better. And that also starts with the boards. Because the boards will house the specific topics you talk about, and with each pin you share and add to the board, the more specific Pinterest can get in sharing that content. So they may recommend some pins based on the title, feel free to add 2-4 that you like or would want to represent the board. That will help fill it up since you’re starting out, and will also keep it at the bottom. So the more content you share, the farther down the board it will be and fewer people will see it there as time goes on.
Just your content will be relevant.
To have a better understanding on why Pinterest boards are important and how to use them, check out Why Pinterest Boards Are Important.
Pin planning
Now we’re to the main part of Pinterest; creating the pins. Depending on what you’ve heard or read, this may be a little bit of the stressful and questioning part.
Because some people will say you have to post 10-20 times a day on Pinterest in order to get traction, but don’t post to the same URL link or else you’ll get flagged as spam. And while that is what some people do, that does not have to be the rule. Pinterest themselves haven’t even said for sure one way or the other what is best.
The biggest thing you want to do though, is to post consistently. And that’s based on how much content you have and what will work best for you.
For smaller accounts or even ones starting out with years of blog posts to share, I’d start with one pin a day, Monday through Friday at the very least.
And here’s how that can look:
If you’re a photographer, you can share a wedding pin, family pin, senior pin, couple pin, and one promoting your Instagram. That’s Monday through Friday.
If you’re a fitness coach, you can share a workout pin, recipe pin, shopping list, mindset quote, and one promoting your Instagram. Again, Monday through Friday.
If you’re a content creator, your topics could be a recipe, outfit of the day, podcast episode, YouTube video, Instagram promotion, even a reel you created. Could be Monday through Friday or you could share more.
Now, the reason I recommend a topic a day, is because we want the URL link to be to a different destination each day too. So a different page on your website, a different platform, even a different affiliate link but that could take some time to be beneficial.
There is a balance many people have shared of not being spammy on Pinterest. And that can happen if you keep sharing the same URL link, even with different pin images. Which is its own thing, but you can read more about that in How to Create New Pin Images.
The big thing you want to focus on is just to create consistency. And that starts with one day at a time.
Also, you can schedule that for free on Pinterest. I’ll explain that more in How to Schedule Out Your Pinterest Pins. There’s free and paid options you can check out.
But overall, that’s it!
You now have a Pinterest account that will start creating traffic to your website, socials, and more that you decide to link too.
However, if after reading this blog and looking at the extra articles, you’re more stressed than you were starting out because you thought you’d just be pinning pretty pictures, don’t fret!
I have a couple options to take this off your plate so you don’t start crying again.
First off, I can set all of this up for you! I’m offering a limited discount on a done-for-you Pinterest Account Set Up. Spots are limited before the price goes up, so if you are curious, I’d check it out now.
And secondly, if you have your account, but the thought of spending more time creating and scheduling content is defeating rather than exciting, I do offer Pinterest Management. This is where I take over your Pinterest account for business, create and schedule pins, do the keyword and trend research to provide content ideas for you, and create a plan to increase your website traffic and sales.
No matter what though, Pinterest is unlike any social media account, as they act more like a pretty Google search engine than another place to doom scroll and feel bad.
Any content you share will only benefit you, and have a longer life than any content you’ve shared on social media.
So happy pinning!